The First Feature
So now we know what we're building, we've installed Visual Studio and created our project.
It makes sense to start by implementing the list of kanban boards.
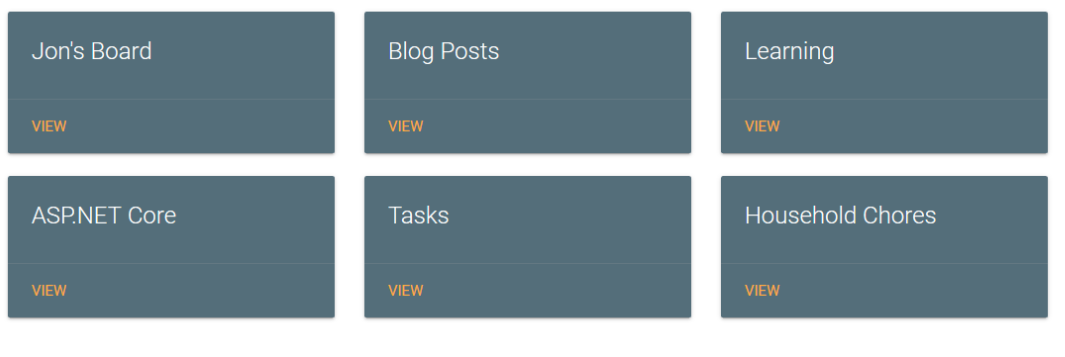
Here's what we're aiming for.

From here our users will be able to navigate to any of the boards (and eventually add more boards).
Before we get too heavy into the details (controllers, views, view models and how they all interact) let's build this boards list view.
Then once you've got a working example under you belt we can dig into more comprehensive explanations of how (and why) it works, as we add more features.
This might look like a lot to absorb in one sitting but remember you can always come back and go through this again.
A brief introduction to controllers
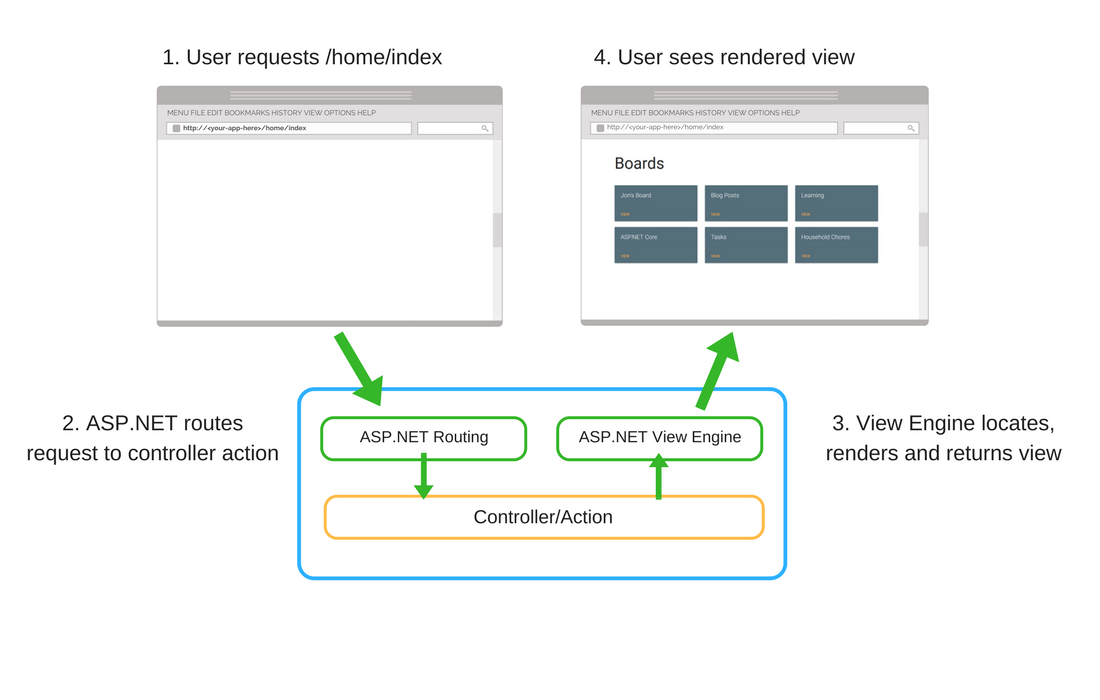
Whatever you build in ASP.NET MVC you're going to need a controller.
When someone requests a page on your site, their request will be routed to a controller, more specifically an action on a controller.
You can think of actions as methods or functions.
For example.
public class HomeController : Controller
{
    public IActionResult Index()
    {
        return Ok();
    }
}
This Index() action is just about as simple as a controller action can be.
We'll look at the details of how web requests are routed to controllers later on, but for now, if we were using the default routing setup for an MVC project, you would trigger the Index action by opening a browser, and navigating to...
http://<your-app-here>/home/index
And, you would get back an empty screen.
Index() returns Ok() which simply tells our MVC controller to return an HTTP status code of 200 (OK).
A 200 (OK) status code means everything worked, and the request was successful.
Of course, you'd rarely do this in the real world and would be more likely to return some content, or a web page (view).
Create a boards controller
With our rough idea of what controllers look like, we need to create one for when users want to view a list of kanban boards.
It's standard practice to have a Controllers folder, and to put all of your controllers in there.
We'll adopt this convention for now to keep things simple.
In your brand new web application, create a folder called Controllers (right-click the Project in Solution Explorer, select Add -> New Folder)
Then right-click on your new folder, and select Add -> Controller.
As we've already seen, Visual Studio likes giving you choices, here's another one...
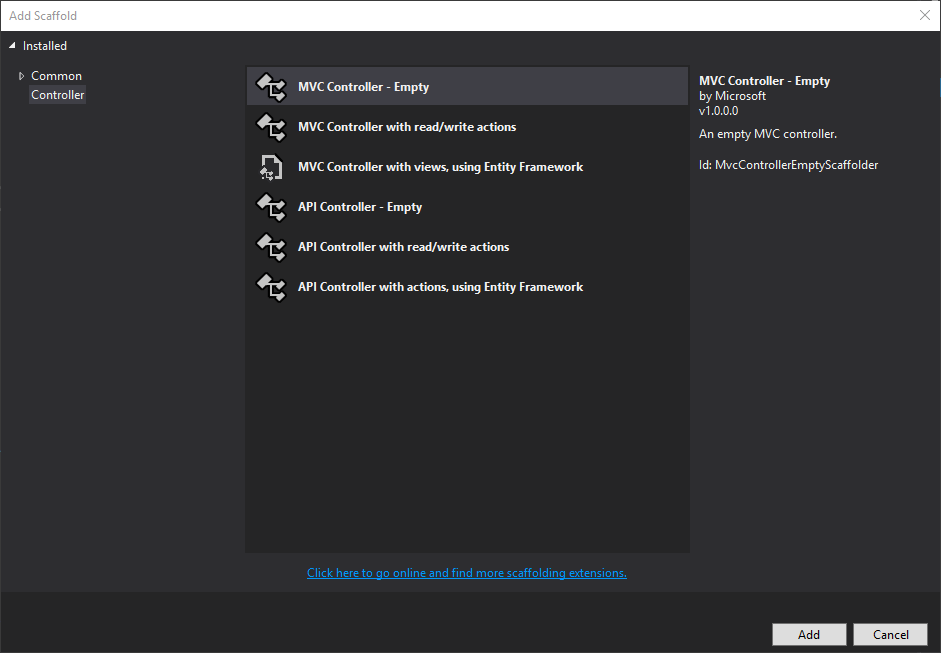
We're only interested in MVC controllers for now, and want to write the code ourselves (not let VS do it for us) so we can stick to the first option MVC Controller - Empty.
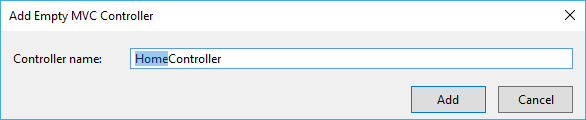
VS will prompt you for a controller name. Call it Home.
Scaffolding
The first time you create a controller in a new project Visual Studio might install some NuGet packages and tell you it's scaffolding.
We'll touch on NuGet later in the series, but think of it as the primary Package Manager for .NET (a bit like npm for front-end applications).
When we instructed VS to create a controller, it added a NuGet package that allows it to some "clever" things like automatically generating controllers for us to support basic operations (like writing to and reading from a database).
This is called scaffolding.
For this course we will generally stick to creating "empty" controllers and writing the code ourselves, so that we get a better understanding of how everything works.
After a short while, you should find yourself looking at this controller...
using System;
using System.Collections.Generic;
using System.Linq;
using System.Threading.Tasks;
using Microsoft.AspNetCore.Mvc;

namespace Dontaello.Controllers
{
    public class HomeController : Controller
    {
        public IActionResult Index()
        {
            return View();
        }
    }
}
This action differs slightly from the example we looked at, can you see what's changed?
Yep, gone is the return Ok() line, and in its place we return a View.
Create a boards list view
Generally speaking, we're going to be using views to display content in our application.
Views let you use standard HTML elements to render your app and mix in dynamic content (for example, from a database) with these standard HTML elements.
A word on MVC Conventions
ASP.NET Core MVC comes with some default "out of the box" conventions.
These defaults cover things like where to look for your controllers and views.
By default ASP.NET Core MVC will expect your views to live in a folder called....
... Views (bet you didn't see that coming).
It also looks at your controller and action names.
Views\<controller-name>\<action-name>In our case...
public class HomeController : Controller
{
 public IActionResult Index()
 {
     return View();
 }
}
... MVC will try to locate a view called Index.cshtml in the Views\Home folder.
Views\Home\Index
Create a new folder at the root of your project and call it Views.
Then right-click on the Views folder and select Add -> Folder and add a "sub folder" called Home.
Finally, right-click on the Home folder and select Add -> View.
What you see at this point may vary, depending on which version of Visual Studio you're using!
Latest Version of Visual Studio
In later versions of VS you'll see this screen first.
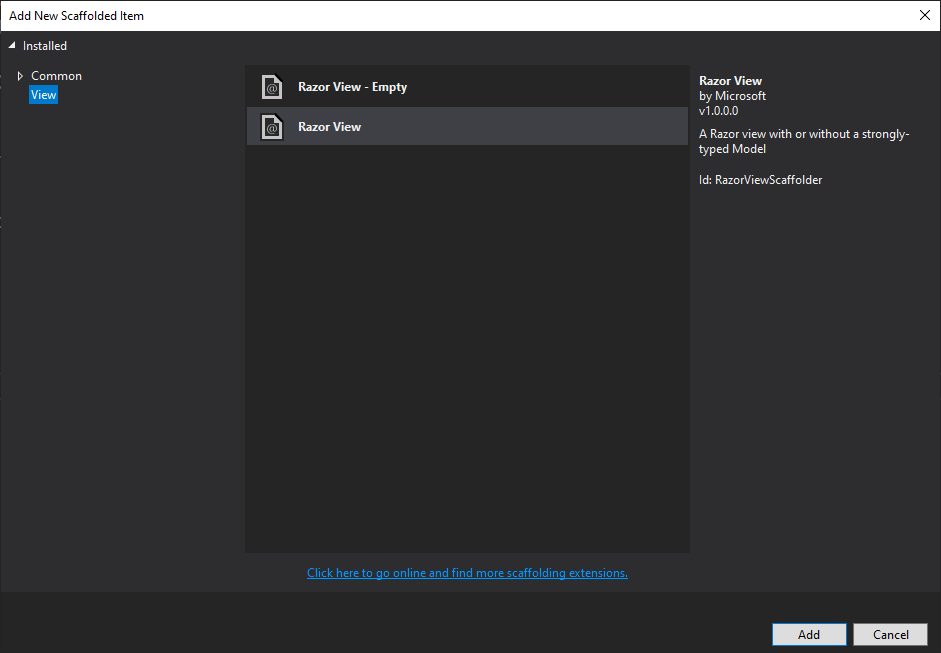
Make sure you select Razor View, then hit Add.
All versions of Visual Studio
Now you'll see this window.
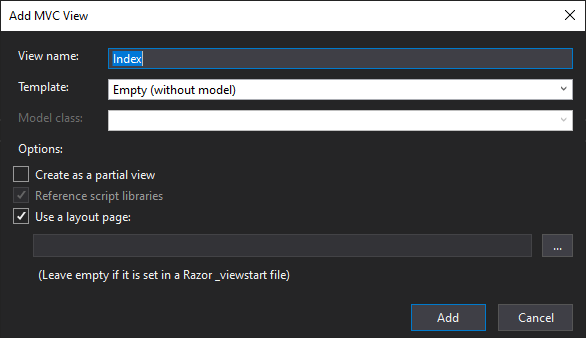
For the most part we can stick with the defaults here.
The key bit is to make sure your View name is Index, so that MVC can locate it.
We'll cover layout pages shortly but for now, leave Use a layout page ticked, and the textbox below it empty.
Hit Add and you'll see the default "new view template" content.
@{
    ViewData["Title"] = "Index";
}

<h1>Index</h1>
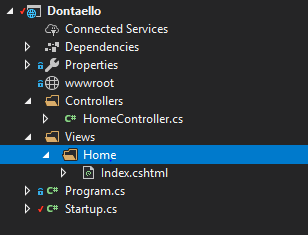
Your new view appears in Solution Explorer (this is a good time to check it's in the right folder, otherwise MVC might not be able to find it).
Never too early to check your work
Before we continue...
What do you expect to see if you hit CTRL+F5 to run your application?
Your shiny new Index page, and the word Index?
Give it a go and see.
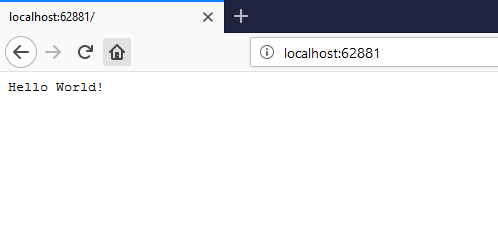
Hmmm, so we're still seeing our original hello world.
Where is that text coming from? and why aren't we seeing our shiny new view?
The answers lie in startup.cs.
Hello Startup.cs
Startup.cs is at the heart of any ASP.NET Core application.
It is the "go-to" place to set up your application, including things like security, routing, whether or not to enable MVC.
Take a moment to figure out where that pesky "Hello World!" is coming from...
app.UseEndpoints(endpoints =>
{
	endpoints.MapGet("/", async context =>
	{
		await context.Response.WriteAsync("Hello World!");
	});
});
Yep, there it is, in the Configure method.
This is the simplest web application you could possibly write in ASP.NET Core, it simply returns "Hello World!", no matter what URL you visit.
The thing is our application doesn't actually know that we want to use MVC and isn't configured to use any of the MVC features such as controllers, views etc.
If we'd chosen one of the other project templates when we created our project some of the following steps would have been done for us.
It can be a useful time saver to use one of ASP.NET Core's starter projects but it also comes at a cost, namely the fact that you get a load of other stuff in your project that you may or may not need.
Plus it's quite useful to understand how to do this yourself, should you ever need to modify an existing project.
Enter MVC
To enable MVC in our application, we need to do two things.
The first bit is done in the ConfigureServices method.
Yours is probably empty right now, so go ahead and add this line...
public void ConfigureServices(IServiceCollection services)
{
    services.AddControllersWithViews();
}
ASP.NET Core MVC relies on various built-in services to work correctly, this line ensures they are all registered and available to our application.
Then we need to tell our app to go ahead and use MVC (with default routing options) by changing the UseEndpoints call in the Configure method.
public void Configure(IApplicationBuilder app, IHostingEnvironment env)
{
    if (env.IsDevelopment())
    {
        app.UseDeveloperExceptionPage();
    }

    app.UseRouting();

    app.UseEndpoints(endpoints =>
    {
		endpoints.MapControllerRoute(
			name: "default",
			pattern: "{controller=Home}/{action=Index}/{id?}");
	});
}
With this, any attempt to navigate to a URL for our application will go through this "controller route mapping" and end up at a controller action (if it exists).
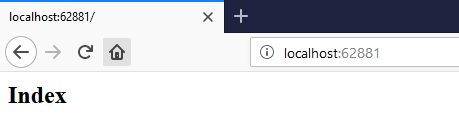
Now try running your application again.
Tada, you should be looking at our amazing home page.
What if it doesn't work?
Whenever you build anything using a framework like ASP.NET MVC things can (and do) go wrong.
The most likely issue you might see here is this one...
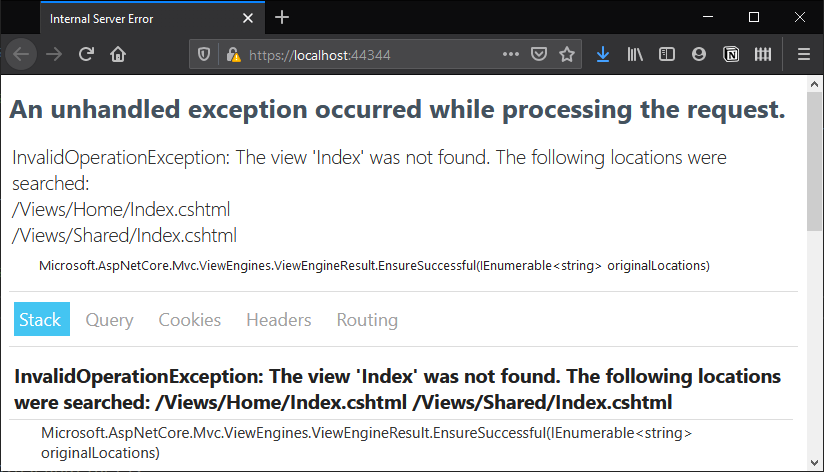
You'll get this if ASP.NET can't locate your view for some reason.
As error messages go this is actually pretty useful and tells you exactly where to look.
If you do encounter it, go ahead and check the folders mentioned to see if your view is in there.
Chances are, the view you thought you added is either in the wrong folder or has the wrong name.
But what about that list of Kanban boards?
Here's a reminder of what we're aiming for with this first feature.
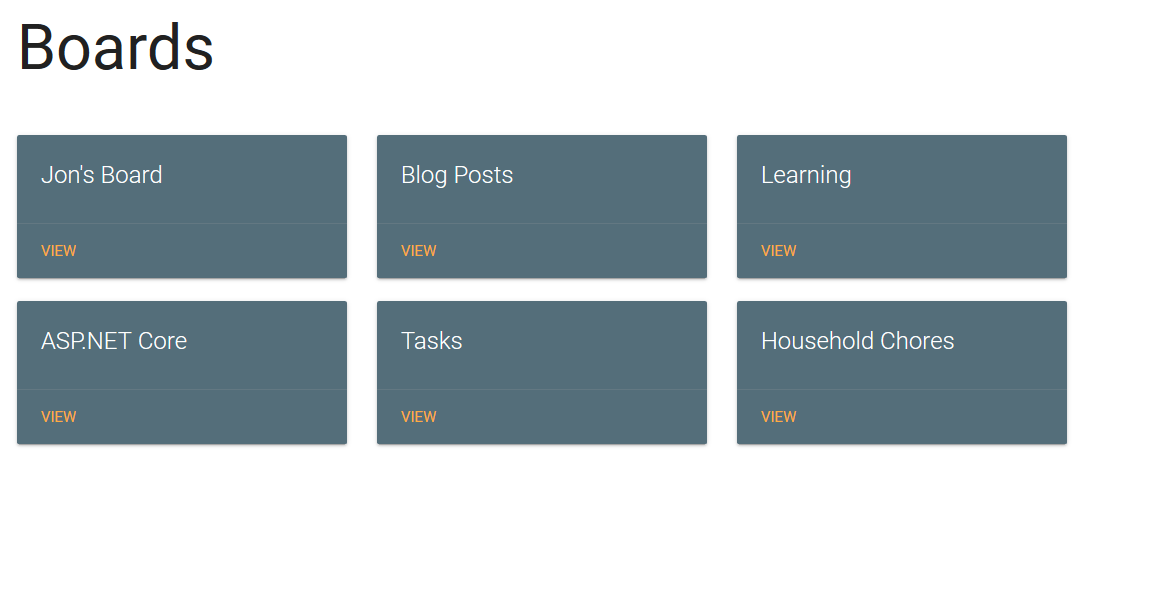
And here's where we've got to.
- Configured our app to use MVC (with default routing)
- Added a very simple controller, with one action that returns a view
- Created the relevant view
- Removed the "boilerplate" hello world code
- Checked everything worked as expected
That last bit is crucial. No matter how small the step you've just taken, testing what you've got so far is always worth doing.
Occasionally (OK, a lot of the time) things don't work as you might expect, and the longer you delay testing, the more you have to backtrack to work out what caused your app to stop working!
Introducing the ViewModel
We've done pretty well up to this point in our exploration of MVC.
In fact, we've touched on the C (controllers) and the V (our basic view), which just leaves us with the M (model).
Specifically, we're going to create our first ViewModel.
We will cover the difference between Models and ViewModels in a subsequent lesson, but for now, you can think of the ViewModel as the place where your data goes so that it can be returned from your controller to your view.
Your view can then show the contents of a ViewModel using some simple binding syntax (which you're about to see).
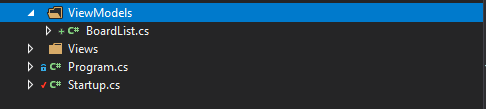
First up we'll create a folder for our ViewModels.
Add a new folder to the root of your project, called ViewModels.
Then right-click and select Add -> Class.
Strangely, Visual Studio is still determined to give you choices at this point (even though we were quite clear that we wanted a new class).
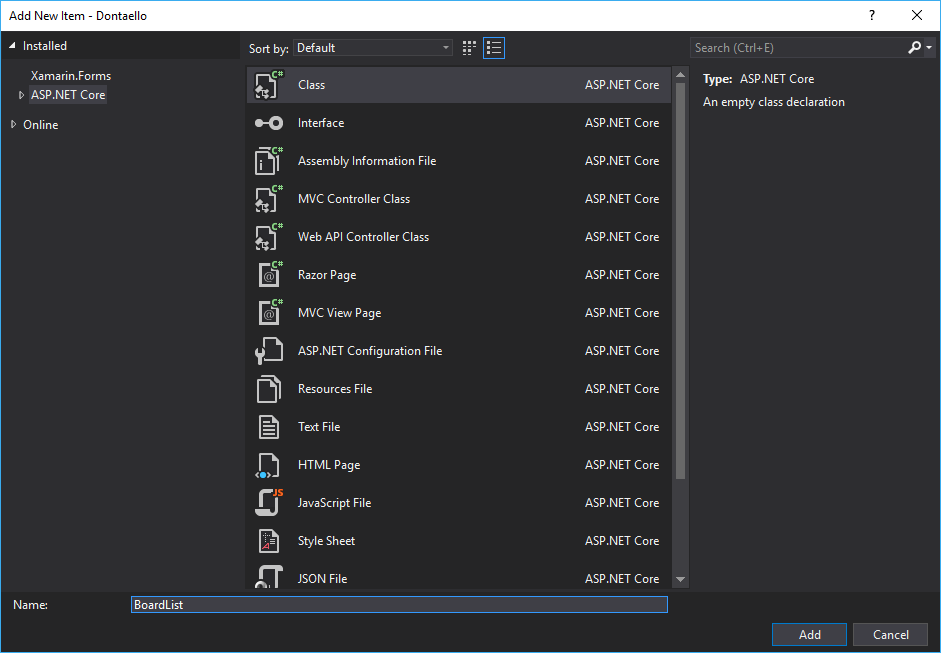
Select ASP.NET Core from the menu on the left, and Class from the pane on the right.
Name it BoardList.cs and hit Add.
Create the first version of a Board List ViewModel
So what does our ViewModel need to contain?
Well, we know we want a list of kanban boards so a list would be a good starting point.
And we know we want something to represent a "board" in this context.
So let's create that Board class first.
We can add a Board nested class to the BoardList class in BoardList.cs.
public class BoardList
{
    public class Board
    {

    }
}
Nested classes
Depending on your experience of C#, this might look a little strange.
You've probably seen a few classes, but not necessarily many nested like this (where one class lives inside another).
All it really means is that this class is always referenced in relation to its parent.
So if you were to try and create a new instance of
Boardfrom somewhere else in your application, you'd need to use its full name like this...var board = new BoardList.Board();You don't have to nest your classes like this but I find it helps to be explicit, in this case being very clear that this
Boardclass is intrinsically linked to our ViewModel and not for general consumption elsewhere in our app.
As far as we're concerned, this ViewModel is only ever going to be used for this one feature/view (a list of kanban boards).
For that reason we don't need to go crazy and add loads of properties to our ViewModel that we don't need.
Remember this image of what we're aiming for?
If you think of each "Board" being represented by an instance of our Board class, what does it need?
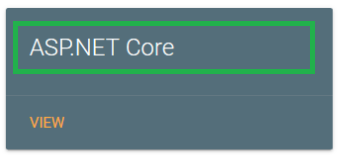
Well for now just a title really e.g. ASP.NET Core.
So go ahead and add a Title property to the Board class.
public class BoardList
{
    public class Board
    {
        public string Title { get; set; }
    }

}
Now what about that list I mentioned? If we want our ViewModel to contain one or more of these "Board" representations, we'll need a list to put them in.
public class BoardList
{
    public List<Board> Boards { get; set; } = new List<Board>();

    // Board class definition omitted for brevity...

}
Add that to the top of your BoardList class and you're good to go.
Object reference not set to an instance of an object
You don't have to include the end of that line...
= new List<Board>();But if you don't, the list will be
nullto start with.This will likely catch you out later. If you subsequently try to add items to the list without making the above call (to "new up" or "instantiate" the list) you'll get a Null Reference Exception.
It's easier all round if you take this defensive step to instantiate the list now.
Your future self will thank you!
Back to the controller
That's our ViewModel defined, so how can we return an instance of it to our view?
We need to revisit our controller action.
Open up HomeController.cs and take a look at the Index action.
public class HomeController : Controller
{
    public IActionResult Index()
    {
        return View();
    }
}
So far we've just returned a View (using the default conventions that MVC uses to locate views).
But we can also return an ViewModel alongside our View.
To do so we'll need to create a new instance of our BoardList ViewModel and pass it in the call to return View();.
public IActionResult Index()
{
    var model = new BoardList();

    var board = new BoardList.Board();
    board.Title = "Jon's Board";

    model.Boards.Add(board);

    return View(model);
}
First up, we create a new instance of our BoardList ViewModel.
Then we create a new Board instance.
We can then set the title of that new Board instance before adding it to the list.
Finally we can return the resulting ViewModel alongside our View.
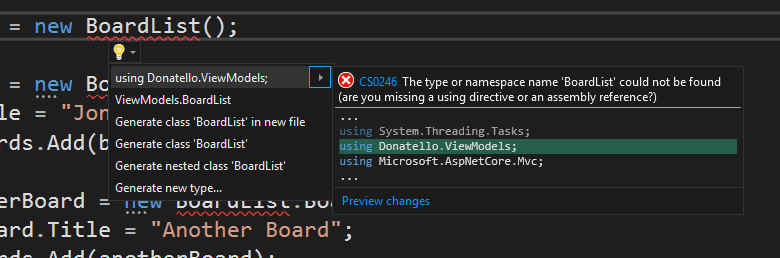
Did you get a red squiggly line when you added this code to your controller? Read on to find out why and how to fix it...
Namespaces
If you add this code to your own controller, chances are Visual Studio will underline any references to
BoardListwith a squiggly red line.This is VS pointing out that you haven't really told it where your
BoardListclass lives, or how to reference it in this controller class.If you hover over the offending code (
BoardList), you'll see a handy explanation, plus a link to Show potential fixes (or you can press CTRL+.).
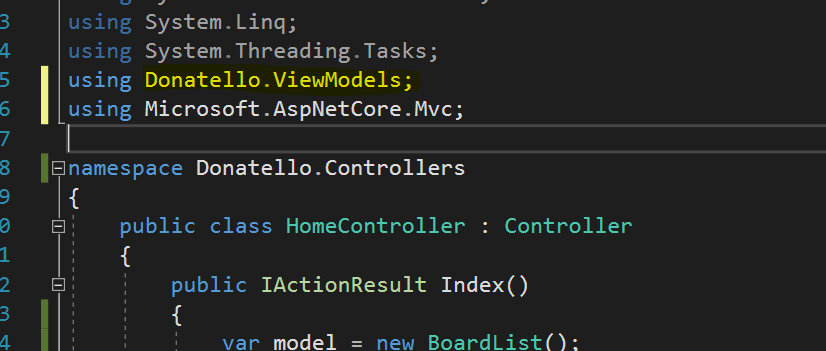
Select the first option and VS will add your ViewModel's namespace to the list of referenced namespaces at the top of the controller class.
The red squiggle disappears and now you can continue to reference any classes in that ViewModels namespace without VS complaining.
Show data in the view (using Razor)
Finally, we have something to show for all our efforts.
Well almost, we just need to make it visible.
To make this "Board List" (albeit only one board right now) visible, we need to display the contents of the ViewModel in our View.
By default, MVC views use something called Razor to show content in our views.
The Razor syntax enables us to bind parts of our HTML markup to the data contained within our ViewModel. This lets us mix our "static" text (headings, paragraphs etc.) and "static" markup (HTML tags such as DIVs etc.) with dynamic data from our ViewModel.
For example, if you had this HTML ...
<h1>Good Morning</h1>... and a property on your ViewModel called
FirstName.MVC could "render" the first name in that heading using this syntax...
<h1>Good Morning @Model.FirstName</h1>Which would render this... (assuming
FirstNameis set to Barry!).

First up, we need to tell our View which ViewModel we're going to be using.
Add this line to the very top of Index.cshtml.
@model Donatello.ViewModels.BoardList

// rest of index.cshtml here...
With that in place, Visual Studio springs into life and gives you Intellisense whenever you reference your ViewModel in the view.
This means you don't have to guess (or remember) what you named your properties on your ViewModel, because Visual Studio will help you out by showing you what's available.
Underneath the <h1>Index</h1> line, add this...
@foreach(var board in Model.Boards)
{
    @board.Title
}
Then hit CTRL+F5 to see what we've got.
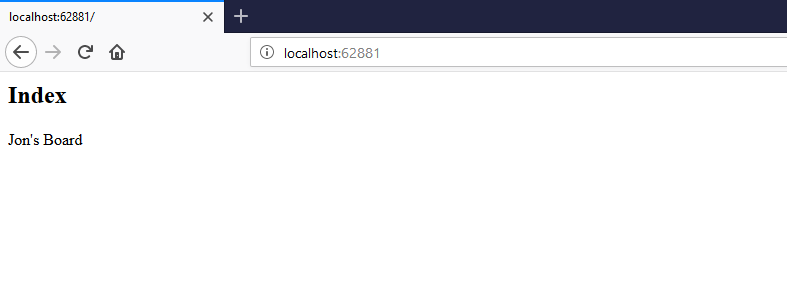
Well we're not going to win any design awards for this one, but it's a start.
The Razor syntax above loops over each board in our Model.Boards list and then spits out the board's title.
Before we go any further let's add another board to our list, just to prove this works as we think it should.
Head back to HomeController.cs and add another board to your list.
public IActionResult Index()
{
    var model = new BoardList();

    var board = new BoardList.Board();
    board.Title = "Jon's Board";
    model.Boards.Add(board);

    // add this...
    var anotherBoard = new BoardList.Board();
    anotherBoard.Title = "Another Board";
    model.Boards.Add(anotherBoard);

    return View(model);
}
Then run your app again and you should see two "boards" in all their plain text glory.
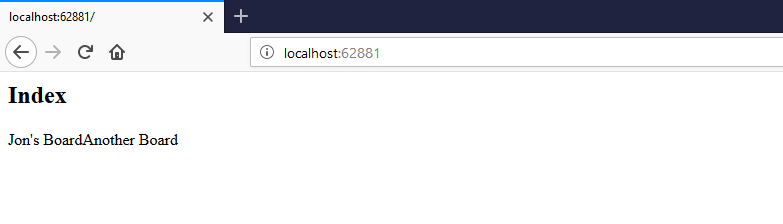
It works!
So we have our list of boards, returned as a ViewModel from a Controller and rendered in a View.
But it looks, well let's be honest, a bit ugly.
Next we'll take a moment to make this look a little closer to the example we saw earlier and bring in a CSS framework to do all the heavy lifting.